


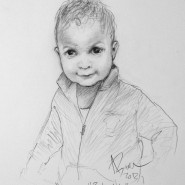
Today I coordinated with production friends to put together videos of me sketching, one with a live person and one from a photograph. It was definitely an interesting experience and a bit of a challenge since I wasn’t able to move around much while drawing and the work area was cramped with lights and cameras. I will share the videos as soon as they are ready. In the meantime, here are the sketches from the day. If you would like to learn how to draw or improve your drawing skills, check out the class schedule and contact me to schedule your first lesson. I look forward to being your...
Read More
Here is a recent project. I was asked last-minute if I could do artwork for an album cover. These days I prefer to work in oils so the time frame of 2 weeks was going to be tight. My painting techniques tend to be illustrative and well-planned, so I needed to pace the stages to meet the schedule. I also made the decision that regardless of how far along I was, that within the last 2 days available I would switch to doing the final work on the computer using Photoshop. I did an initial rough sketch of my primary idea and emailed to the musician if he had any existing photo reference that matched the pose, or to at least send photos snapped from a phone. While waiting for feedback, I prepped a 24″x24″ canvas with tinted gesso. I chose a red hue as a base, mixed a dark red hue in with white gesso and brushed that onto the canvas using a large brush. This was allowed to dry for 24 hours while I got approval for the sketch, some reference photos and worked on a full sketch to base the painting on. After the gesso dried, I transferred the sketch to the canvas using charcoal. My usual method is to scan or photograph the sketch and then project it onto the canvas using a digital projector, but if I am working on a hard surface like a wood board then it’s more accurate to do a trace and rub method. Occasionally a sketch is transferred by eye if the basis is simple enough. After the charcoal lines are drawn onto the canvas, I spray it lightly with a casein-based fixative, wait a few minutes for the fixative to dry and then spray it again. This helps keep the charcoal lines from bleeding with the initial paint layers which I have to add some turpentine to for thinning and speeding up drying so that I can start working off the base paint layer within 24 hours. The initial layers are painted on very thinly, mainly focusing on broad areas for coverage and line work where most edges will be found. Often initial stages of oil paintings done this way may have a cartoonish...
Read More
Many students enjoy seeing the process of building up a painting in stages. This painting, which was a portrait of a girl based on a photograph of mine, was completed over approximately 5 weeks. Each stage was allowed to dry for about 1 week before the next layer went on. Not all oil paintings would normally require that much time to complete, especially portraits, but the number of hours actually involved in the painting process were between 12-15 so it only seems like a long time because of the extended drying time wait. The way I work normally 2-3 days would be fine between layers. I first sketch lightly onto a prepared canvas, based on the photo reference. The initial paint brushed on is focused on the detail areas and main edges, particularly the face. The more edges and base details I can pain in during the initial stage, the closer I can get to my desired final result. After a week, I mix in the major hues that will dominate the final painting and brush them into all the areas, leaving very little canvas still exposed. This second layer is still relatively thin. The couch needed to have softer edges to simulate being out of focus in the background so initially I paint the edges in hard and then soften them up carefully with a light brush and cross-hatching strokes. In this stage it’s OK if some brush strokes don’t perfectly follow the hard edge of foreground elements, as those edges can be more strongly defined toward the final stages. The next stage I start to better define the detailed areas of the face and edges of the arms and am purposefully using complimentary colors. This will look odd at first until the future layers get worked in. When working on a portrait, it’s also preferred to stay away from brushing in hair color right away since the effect will look more natural when the bush strokes of paint are layered on top of the facial features. In the next stage I added more depth and texture to the background couch, added in a base coat for the hair (mostly glazed with heavy amounts of Liquin mixed in) and colored in the skin...
Read More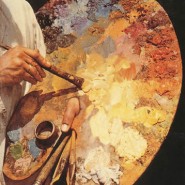
Students might wonder why oil paint is the medium of choice when teaching beginners. Oil painting can seem intimidating and cumbersome, especially when more time-optimal mediums like watercolor or acrylic paint might better suit a student setting. Oil, however, is arguably the best medium to teach painting and the reasons are many. The drying time of oil allows a student to slow their pace without worrying that the portion of the painting being worked on will dry before they get a chance to mix or adjust their work. If faster drying is needed, early layers can be thinned with turpentine to force fast drying for the base and additional layers can be mixed with alkyd resin mediums (such as Liquin) to speed the drying times of the thicker (or “fatter”) layers. By forcing the pace to be slowed down, it allows a lot of time flexibility for the artist to build up the painting in a more controlled and less chaotic way. Additionally, just because oil painting is slow-drying does not mean a complete painting can’t be made in a single sitting. The alla prima technique of oil painting proves it can be a great medium for single-session work, often with results that outshine what can be done with fast-drying mediums. Oil paint is also quite forgiving to enable the painter to go back and make adjustments both while earlier layers are drying and after layers have already dried, without the appearance of over-painting or inconsistency in layers or textures. Brush maintenance is another benefit of oil paint. An artist can wait until completely done with a painting session before attending to the cleaning of brushes. When cleaned and maintained properly, brushes used for oil painting can have a long life. Anyone who has painted with acrylics knows the constant battle of ensuring brushes are not ruined when accidentally left out for just a few moments before cleaning. Lastly, oil painting techniques have been around for hundreds of centuries, with works of master artists going back to the 15th century who we can study and learn from. If you would like learn how to paint with oils,check out the class schedule and contact me to schedule your first lesson. I look forward to being your...
Read More
Recent Comments